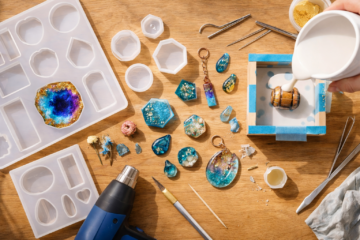
Your Mold is the Foundation of Everything
Every stunning resin creation—a glistening geode, a delicate piece of jewelry, a perfect replica—starts with one crucial decision: Should you buy a ready-made mould for resin casting or make your own? This single choice can be the difference between a flawless piece and a sticky, bubbly mess that ruins your project (and your motivation).
This guide cuts through the confusion. We won’t just show you pretty pictures; we’ll give you the clear, actionable knowledge to confidently choose your path, select the right products, execute perfect casts, and troubleshoot like an expert. Let’s build the foundation for your resin success.
The Big Decision: Should You BUY or MAKE Your Resin Mold?
There’s no single right answer—only the best choice for your specific project, skill level, and goals. Use this breakdown to decide in seconds.
When to BUY a Pre-Made Mold
Ideal for: Beginners, standardized projects, and saving time.
- Pros: Start casting instantly. Achieve perfect, consistent results every time. Access to incredibly intricate, professional designs (from gemstone facets to detailed figurines) that are difficult to DIY. Often more cost-effective for a single, small project.
- Cons: Limits your creativity to existing shapes. Can be expensive for large or unique molds. You’re dependent on the mold maker’s quality and design.
Verdict: Buy if you want to start learning resin casting quickly, need a common shape (like a coaster or a simple pendant), or want to achieve complex details without advanced mold-making skills.
When to MAKE Your Own Mold
Ideal for: Custom projects, copying unique objects, and producing multiple copies.
- Pros: Total creative freedom to cast ANY object you own. Becomes highly cost-effective if you need 5, 10, or 50 identical copies. The skill unlocks endless project possibilities.
- Cons: Requires an upfront investment in silicone and learning. The process takes time (making the mold, then curing it). Your results depend entirely on your technique.
Verdict: Make your own if you want to create a one-of-a-kind piece, reproduce a sentimental object, or plan to sell your creations and need a custom, reusable mold.
The Buyer’s Handbook: Choosing the Best Pre-Made Mold or Kit
Understanding the Two Main Mold Types
- Flexible Silicone Molds: The industry standard. They’re flexible, durable, and make demolding easy. Look for “platinum-cure” silicone for the best results and odor-free operation.
- Rigid Molds (HDPE/Plastic): Used for specific techniques like open-face casting or when an ultra-smooth finish is required. Less forgiving for beginners due to difficult demolding.
For 95% of crafters, a high-quality silicone mold is the perfect starting point.
Top Starter Kits Compared
Beginner kits bundle mold-making silicone and casting resin, offering a complete entry point. Here’s how top options stack up.
| Kit Name | Silicone Type & Cure Time | Included Resin Cure Time | Best For | Key Consideration |
|---|---|---|---|---|
| Xencast Starter Kit | CS25 Silicone (~12 hours) | Xencast P2 Resin (~30 minutes) | Beginners wanting speed; fast production of copies. | Very fast resin cure allows quick demolding and rapid iteration. |
| Polycraft Medium Kit | GP-3481-F Silicone (6-8 hours) | SG2000 Resin (15-20 minutes) | Highly detailed figurines and miniatures. | Extremely fast-curing resin is excellent for capturing intricate details without bubbles settling. |
| Generic Amazon DIY Kit | Varies (Often 12-24 hours) | Varies (Often 24-48 hours) | The absolute budget-conscious beginner. | Quality can be inconsistent. Perfect for practicing the process before investing in premium materials. |
Your Pre-Made Mold Checklist
- Flexibility: It should be pliable enough to pop casts out without tearing.
- Draft Angle: Slightly tapered sides make demolding infinitely easier. Avoid molds with straight, undercut sides.
- Seam Lines: Look for molds with minimal, fine seam lines to reduce finishing work on your final piece.
- Material: Ensure it’s labeled for use with epoxy or polyurethane resin.
The Maker’s Masterclass: Your Step-by-Step DIY Mold Making Guide
Ready to create something truly unique? Follow this professional process.
Phase 1: Preparation is Everything
- Choose Your “Master” Object: It must be non-porous (plastic, glass, sealed wood, metal). Avoid things like untreated clay or porous stone.
- Prepare the Object: Clean it thoroughly with soap and water. Let it dry completely. For a perfectly smooth finish, you can apply a light coat of primer or sealant.
- Build a Mold Box: Create a leak-proof wall around your object, leaving at least 1cm of space on all sides and above. Use LEGO bricks, foam board, or even a cardboard box lined with packing tape.
- Apply Release Agent (If Needed): If your master object is also made of silicone, a release agent is mandatory. For other materials, it can help extend mold life.
Phase 2: Mixing and Pouring the Silicone
- Mix Precisely: Follow the manufacturer’s mix ratio EXACTLY. For accuracy, use a digital scale (weight), not volume. Mix slowly and thoroughly for the full recommended time, scraping the sides and bottom of your cup to avoid unmixed pockets.
- Pour Strategically: Pour your mixed silicone in a thin, steady stream from high above one corner of your mold box. Let it flow over and around your object slowly. This minimizes air bubbles.
Phase 3: Curing and Demolding
- Let it Cure Undisturbed: Place the mold box on a level surface and leave it alone for the full cure time. Do NOT try to speed this up with heat unless the instructions specify.
- Demold with Care: Once fully cured, gently dismantle your mold box. Slowly and carefully peel the flexible silicone away from your master object. If it resists, use a blunt tool like a popsicle stick to gently pry a corner open.
- Your Custom Mold is Ready! Allow it to sit for another 24 hours for a full post-cure before its first use for best results.
Pro-Level Troubleshooting: Solve Sticky, Bubbly, and Failed Molds
Even pros encounter problems. Here’s how to diagnose and fix the most common issues.
Problem 1: “Why is my resin STICKY or uncured?”
- Primary Cause (90% of the time): Incorrect mix ratio or insufficient stirring. Resin and hardener must be measured perfectly and mixed for the full recommended time.
- Other Culprits: Cold workshop temperature (below 21°C/70°F), high humidity, using expired or contaminated products.
- The Fix: Always mix by weight, not volume. Stir for at least 3-5 minutes, scraping the sides and bottom. Ensure your workspace is warm. Store resin and silicone in a cool, dry place.
Problem 2: “How do I get rid of BUBBLES for good?”
- The Science: Bubbles are trapped air. They get mixed in during stirring or come from porous objects.
- The Beginner Fix: After pouring, use a heat gun or culinary torch held briefly over the surface. The heat thins the resin, allowing bubbles to rise and pop. Never hold the flame too close!
- The Pro Fix: Use a pressure pot. Placing your mold in a pressure pot during resin cure compresses bubbles to near invisibility. This is the gold standard for clear, bubble-free casts.
Problem 3: “My creation is STUCK in the mold!”
- Cause: No draft angle (undercuts), no release agent, or a mold that is too rigid.
- The Fix: For DIY molds, always design with a slight taper. For tricky demolds, try placing the mold in the freezer for 15-20 minutes. The resin will contract slightly and often pop right out. As a last resort, you can carefully cut a simple mold to free the piece, but this destroys the mold.
FAQ: Your Top Resin Mold Questions, Answered
Q: Can I use bathroom caulk silicone to make a mold?
A: Absolutely not. You must use specific platinum-cure or tin-cure mold-making silicone (like the kits mentioned above). Craft and hardware store silicones are not formulated for this and will inhibit the curing of your resin, creating a permanent sticky mess.
Q: How many times can I reuse a silicone mold?
A: A quality mold, with proper care, can last for 20-50+ casts. Care includes gentle cleaning with soap and water after each use, avoiding sharp tools during demolding, and letting it rest between uses.
Q: Do I always need to use a mold release?
A: For resin casting into a silicone mold, often not—silicone is naturally a good release surface. However, using a light spray or brush-on release agent (like Ease Release 200) will significantly extend the life of your mold and make demolding easier, especially for complex shapes.
Final Verdict & Your Path Forward
Mastering your mould for resin casting is the single greatest skill you can develop in this craft. It transforms you from a passive consumer of pre-made shapes into an active creator of anything you can imagine.
Your Action Plan:
- Start Simple: If you’re brand new, buy a small, simple silicone mold and a beginner resin kit. Master the basics of mixing, pouring, and demolding first.
- Level Up: Once comfortable, use a starter kit to make a mold of a small, simple object you love. Practice the process.
- Solve Problems: When (not if) you encounter stickiness or bubbles, refer back to our troubleshooting guide. Every problem is a learning opportunity.
The journey from beginner to confident mold maker is incredibly rewarding. Choose your first project, gather your materials, and start creating.